I have been creating posts with scripts to do small stuff, but on this post I would like to show/teach you how to implement the jQuery UI Autocomplete Widget. I have to remark that for the style of the application I am using Bootstrap, so the most important thing is the html code of the form and the Javascript code. This is the Part 1 of the tutorial.
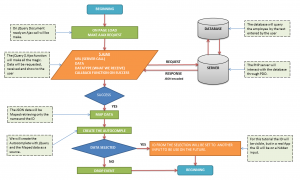
I would like to show you a diagram of the application flow so click it to enlarge.

As you can see the application will load the information when the page loads, this is why the tutorial is Part 1, on further tutorial the information will not be loaded until the user type the information to search. Now, the code.
THE HTML FORM
The next code will be the code to for the HTML form. So take notice that the most important part of this code is the Input and where the search information will be typed and the Input where the result of selection information will be place.
| 1 2 3 4 5 6 7 8 9 10 11 12 | <form class="form-horizontal" role="form" method="get"> <div class="form-group"> <label class="col-sm-2 control-label" for="name">Type the name to search</label> <div class="input-group col-sm-9"> <input id="name" name="name" type="text" class="form-control" placeholder="Type the name to search. The information of this field is already loaded." /> </div> <div class="input-group col-sm-9"> <br> <input id="id" name="id" type="text" class="form-control" placeholder="The selected Id will be loaded here." /> </div> </div> </form> |
THE AJAX CODE
This a Ajax code will be use when the page loads, so don’t forget to wrap your jQuery code on the Document ready.
| 1 2 3 4 5 6 7 8 9 10 11 12 13 | $(document).ready(function(){ $.ajax({ url: "php/search1.php", dataType: "json", success: function(response){ // The mapping code will be here // The Autocomple code will be here } }); }); |
This is the meaning of the jQuery Ajax parameters:
- URL: This is the path where the data will be sent. Also this script will query the database and return a response.
- DATATYPE: With this parameter we are specifying the data that we are expecting to receive.
- SUCCESS: A callback function that will be trigger when the request is successfully completed.
URL
We are going to make a query to the database to search all the employees. Our file search1.php have all this logic.
search1.php
| 1 2 3 4 5 6 7 8 9 10 11 12 | <?php require_once 'Connection.simple.php'; $conn = dbConnect(); $OK = true; $data = trim($_GET['id']); $sql = 'SELECT * FROM employee'; $stmt = $conn->prepare($sql); $results = $stmt->execute(array($data)); $row = $stmt->fetchAll(); $error = $stmt->errorInfo(); echo json_encode($row); ?> |
This file has 3 sections:
- Connect to the Database.
- Query the information.
- Convert the information retrieved into JSON with the json_encode() function and echo it.
The JavaScript Part
We are going to split the success function into 2 parts. The first part will parse the information retrieve from the database and store it into an array, this array will be use to fill the Autocomplete. The second part will use the array previously created and create the Autocomplete with the ID and the value.
1) Mapping code.
| 1 2 3 | var data = $(response).map(function(){ return {value: this.name, id: this.employee_id}; }).get(); |
This part is a little bit tricky. We use two jQuery functions: map() and get().
map()
Per jQuery site this is the description of the function: Pass each element in the current matched set through a function, producing a new jQuery object containing the return values.
The first time I read this definition I had my eyes spinning, I understand this function only by using it. In our example the file search1.php will return a JSON file, so with the map() function we can loop through each element and retrieve the ID and the value.
get()
Per jQuery site this is the description of the function: Retrieve one of the elements matched by the jQuery object.
In our example what we get is the object created by map on each return, thus we will have an array created with the information of our JSON. Each element on the array has the name and the ID.
2) Autocomplete Code.
| 1 2 3 4 5 6 7 | $('#name').autocomplete({ source: data, minLength: 0, select: function(event,ui){ $('input#id').val(ui.item.id); } }); |
With the jQuery Autocomplete were are going to use this two function:
- SOURCE: This is where the information is located, for our example that source of data was created with the map() and get() functions.
- MINLENGTH: Minimum data to be typed in order to trigger the Autocomplete.
- SELECT: This is trigger when the user selects a value from the dropdown list of the Autocomplete. We are going to assign the value from the name to an input, either you can have visible this field or hide it. In our example we are not submitting any data, but you can use this in your projects. You can also store that value in a variable for future references.
This is our final JavaScript-jQuery code:
| 1 2 3 4 5 6 7 8 9 10 11 12 13 14 15 16 17 18 19 20 21 22 | $(document).ready(function(){ $.ajax({ url: "php/search1.php", data: {id: 1}, dataType: "json", success: function(response){ var data = $(response).map(function(){ return {value: this.name, id: this.employee_id}; }).get(); $('#name').autocomplete({ source: data, minLength: 0, select: function(event,ui){ $('input#id').val(ui.item.id); } }); } }); }); |
As you can see is not complicated. We just need to push the right buttons. This is just an example of many stuff that you can do with jQuery and the UI suite.

